If, by any chance, you decide to use the Facebook Github sample as inspiration for your own application then you’ll need to register your application with Facebook or other Software as a Service (SaaS) provider. This is something I’ve already mentioned this in my blog on OAuth Admin Steps, which describes how you need to visit https://developers.facebook.com/apps to register your application with Facebook.
In registering your app with Facebook or any other SaaS provider, you’ll be creating an app id/key (also known as a client id) and app secret. These you’ll use in your application as part of the Spring Social Connection Factory. In the case of Facebook they're used by the FacebookConnectionFactory class.
  private static final String appId = "439291719425239";

  private static final String appSecret = "65646c3846ab46f0b44d73bb26087f06";
@Bean
public ConnectionFactoryLocator connectionFactoryLocator() {
logger.info("getting connectionFactoryLocator");
ConnectionFactoryRegistry registry = new ConnectionFactoryRegistry();
registry.addConnectionFactory(new FacebookConnectionFactory(appId, appSecret));
return registry;
}You’ll notice how I’ve hard coded these values for simplicity - after all this is only a sample. I guess that in the ‘real-world’ they’ll be included in a configuration file...
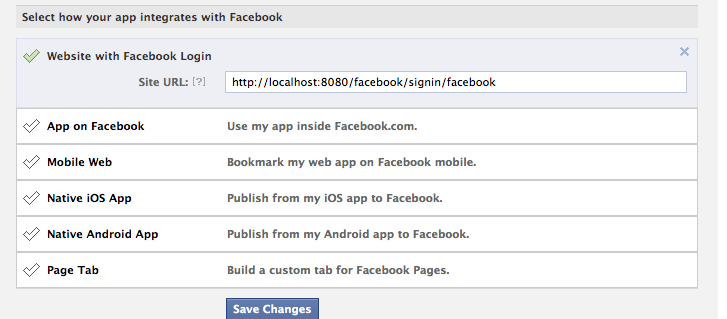
In setting up your Facebook client, there’s only one real Gotcha to be aware of. As well as creating an app id and secret, you’ll also need to define what Facebook calls the ‘Website with Facebook Login’ also known as the ‘Site Url’. This is the redirect URL that tells Facebook where to call back to during the OAuth conversation. In practical terms, for this sample it’s:
http://localhost:8080/facebook/signin/facebook
...which breaks down into your server’s URL:
http://localhost:8080/facebook
... and the request mapping handled by Spring’s ProviderSignInController, which in this case is:
singin/facebook
...but is more generically defined as:
signin/{providerId}
where ‘providerId’ is facebook, twitter, linkedin etc.
The image below shows the section of the page that you need to edit:
Note that if you’re developing behind a proxy server, you’ll need to modify this value to match that of your proxy.
As this value needs to be hard-coded into Facebook or other SaaS, then a good approach to take is to create a bundle of applications in the same account, one for each stage of your development each with their own app id, secret and redirect URI. For example:
- Development: http://localhost:8080/facebook/signin/facebook
- Testing: http://my.company.com:8080/myapp/test/signin/facebook
- UAT: http://my.company.com:8080/myapp/uat/signin/facebook
- Live: http://my.company.com/myapp/signin/facebook
You can then add the app ids and secrets to a set of property files that are included in your WAR file on a per build type (dev, test, live etc) basis: Maven’s filter properties is very good at sorting this out for you - perhaps I should write a blog on it...
The Facebook sample code is available at: https://github.com/roghughe/captaindebug.git
No comments:
Post a comment